Decisive Introduction
This last weekend (March 16th) I managed to pull out victory with SteelHeart’s Champions, that’s the 8th warband I’ve won glass with at this point (more unabashed boasting at the end of the article), at the Forge in Manchester. This article is going to go into detail about the deck and game strategies that I employed, including board selection and warband matchups. The article is not meant as an introduction to how the warband plays, I will assume that you know what the fighters and cards do if I refer to them by name. It might be worth popping open a tab for your favourite deck builder for ones that you can’t quite remember.
For anyone wondering about the lack of content on the site over the past couple of weeks, I have been busy with my 3 monthly pilgrimage to Path of Exile and Tom has been waiting till he wins glass with The Godsworn Hunt before he bashes out an article on them, Hobbit and Vanadis have been busy with this strange stuff called real life (something to do with moving house or some such).
An idea is born
Normally I would start with a deck list for you to feast your eyes on and go into detail about each individual card choice and why I felt it was justified. This time I want to do something a little different and show the process I went through to craft the deck.
Warband choice was not much of a consideration for me, I had seven left to pick from and pretty much picked Steelhearts because it would be pretty weird if a writer for Steel City Underworlds won with them last. Just over a month or so ago I had won glass with Mollog (article was pulled because it was made irrelevant with all the FAQ/Bar updates) and Steelheart’s felt like they could work in a similar fashion. So I adapted my Mollog deck to be a bit more Steelheart friendly and went to my weekly practice session.
Below is the deck that I took to that practice session:
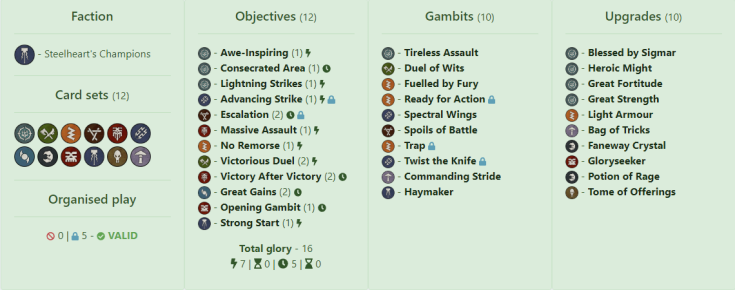
I thought that this was a solid way to build Steelheart’s, I had cards to make up for their lack of mobility in Spectral Wings/Commanding Stride as well as ways to one shot enemy 4 health fighters from turn 1 with Twist the Knife/Trap or even Spoils of Battle + a damage upgrade. The deck was heavily focused on score immediately cards which themselves relied on me getting kills, so to increased my odds of hitting those important attacks I packed both Haymaker, Fuelled by Fury and Tireless Assault. With these thoughts in mind and a lot of confidence from my recent Sepulchral Guard win I rocked up to the Outpost (our FLGS) ….. and got destroyed by everybody I played.
Turns out that the deck wasn’t ready.
On the plus side, it’s far easier to learn when you are losing then when you are winning and this exact same thing had happened to me with the Sepulchral Guard deck with my first practice session.
Lessons I learned from that practice session:
- I hate Victory after Victory, one game I managed to score all 7 of my score immediately cards in round 1, and then in round 2 I drew Victory after Victory, it was now impossible for me to score the card.
- Relying on a lot of conditional score immediately cards is an absolute nightmare to play with, sure when the stars align you can get through your deck very fast and pile on the glory but if your opponent has anything to say about it you can be stuck at the first hurdle with nothing to show for it.
- Steelheart’s are not as resilient as Mollog. I know this seems obvious but when building the deck I thought that three 4 wound fighters that can inspire to 2 shield defence would be tougher overall then the big troll. When you factor in extra attacks like My Turn/Aggressive Defence on Mollog, alongside all the extra healing he can get from Vampiric Weapon, it turns out that he is far more resilient then our Stormcast trio.
- I needed Superior Tactician, I had ditched it because it was restricted and I thought that Great Gains could act as a replacement, with the way the deck was built and played I found many cases where I could have got 3 glory from Superior at the end of the game whereas Great Gains was often dead in my hand.
- Even with the mobility cards that I had packed into my deck I found that my opponents could still choose far more often than not when a fight would happen, they could feed their weaker fighters to me early and set up unstoppable charges with the big guys once they had their glory, I felt like I had very little control over a given game, this leads directly into my next point.
- I wasn’t having fun with the deck, at all. I really hate playing pure aggro decks where you just see the nearest fighter and charge for them. It reduces all of the complexity out of the game and becomes more of a question of who can roll the best dice. It also puts you at the mercy of better decks that can dance around you and score glory without having to risk the ire of the dreaded dice gods.
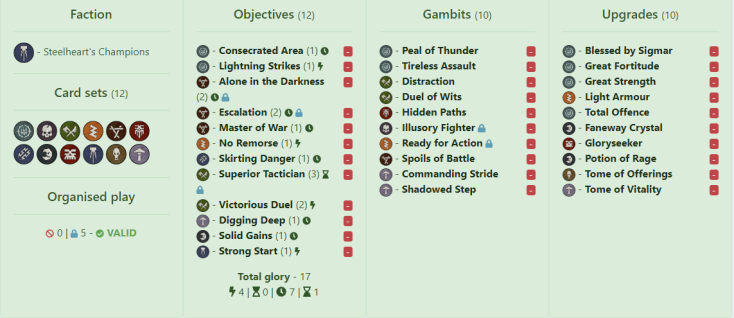
So back to the drawing board I went. What emerged is the deck that I took to Vault 14 in an effort to win the much coveted glass.

So, less unreliable score immediatelys, more control over how I engage my opponents (Hidden Paths/Shadowed Step) and more reliable glory, in the form of Superior Tactician/Solid Gains/Master of War/Alone in the Darkness. This did come at a cost though. I had had to cut Trap and Fuelled by Fury, both cards that I was finding useful previously. As you can already guess this version of the deck did not win glass. I lost to two players on the day, a very well-played Mollog and an exceptionally piloted Curse Breakers, who managed to win the event (if you want to hear from the guy who played the Curse Breakers, Dan Smedley, alongside a guest appearance from yours truly and Tom, then you can listen to Ready 4 Actions tournament podcast here). I could take some solace in the fact that I was the only player to take a single game off of the Cursebreakers all day but let’s be reasonable, I had lost as many matches as I had won, this was far from the result I was hoping for.
Specific issues that I had found with this version of the deck:
- Alone in the Darkness was nowhere near as reliable as I had hoped it would be, my opponents constantly positioned their fighters to deny it and there was very little I could do to stop them.
- Get Thee Hence is absolutely god awful in Steelhearts, I had thought that with Obryn’s in built knockback that it was an easy objective to pop in, the problem is that you can only score it when you don’t also kill the fighter (unless you are using lethal hex shenanigans) and you if you are putting yourself in enough danger to attack then you need to be looking for that kill.
- Because my ‘passive’ glory was not reliable enough I was still having to fight at disadvantageous times in order to try and desperately get what glory I could, this was in spite of all the nice mobility ploys I now had in the deck.
- I still died to easily in an all-out brawl. Magore’s Fiend’s or Mollog could absolutely smash me if we are all swinging at each other and Cursebreakers could gain more passive glory and then use upgrades/inspired stats to smash me.
So I needed to solve these problems in order to win. Below I will move into the final version of the deck that actually won me glass, before I do though its worth thinking to yourself what changes you might make to the deck and then compare them to what I ended up doing.
The Deck
If you want to play around with the list yourself then you can use this link.
Probably the first thing you will notice is that Alone in the Darkness was not cut, well that’s because I put both Distraction and Peal of Thunder in. Combining both of those push cards meant that I not only had a reliable way of scoring one of my best objectives but also gives me great tools for disrupting decks that like to control objective tokens. I cut my last reliable way of killing a 4 wound fighter on turn one by ditching Twist the Knife and swapping it for another fantastic mobility card in Illusory fighter. I also got myself some more passive glory in the form of Digging Deep and Skirting Danger, Digging Deep is amazingly easy to score if you have Duel of Wits in hand and fairly reliable in other cases (more on that in the playstyle section) while Skirting Danger is something you can passively score even if you are fighting with all the ‘teleport’ cards that you have, just make sure to teleport to the right hexes. Total offence was a last minute addition, I decided that I had lots of ways to try and use it because I often placed myself next to my opponents anyway, instead of charging, and that it would make a kill more reliable then Heroic Might in those situations.
One of the hardest cards to cut was Spectral Wings, it is an amazing card, but I found that with all the teleports (for reference I consider Hidden Paths/Shadowed Step/Faneway Crystal/Illusory Fighter and even Commanding Stride as teleports) I had that I was getting to choose my fights just fine and that leaving my fighters within 5 hexes of an opponent is often close enough for people to still just normal charge you, looking at you Riptooth.
I am genuinely quite proud of this deck, I think it’s very solid and it’s probably the closest thing that I would take to a Grand Clash that I would publish on this site (I have to keep my secrets). All that being said, I still only played with it for about 3 weeks, if you wanted to get serious with it then you probably want to tweak it a fair bit yourself.
If I was going to make any changes to this deck myself I would be very tempted to try and fit transfixing stare in, it’s a reliable way of stopping a charge from an enemy fighter. The ploy card that I would most likely drop is Duel of Wits but right now it really helps with scoring Digging Deep, if you can find an objective that you prefer then try swapping those cards.
Playstyle
The biggest achievement that I unlocked with the decks final form was that I had found a way to play Steelheart’s that I actually enjoyed. The general gist of how the deck plays now is that you deploy far far back, like the defensive Steelheart decks of old, spending the majority of your first turn drawing power cards. Then in the 4th activation you strike, you teleport to the most juicy target and cash in on some score immediatelys. In the turns that follow you can either choose to teleport in the rest of your fighters for an all out engagement or play a game of hide and seek around the boards.
This playstyle has a lot of the advantages that the old full defensive decks used to have, aggro opponents will spend a lot of activations just moving towards you before they can score any glory, the difference being that you will want to eventually bring the fight to them. Deciding when to go in can be quite a tough call. If your opponent’s fighters all have 4 wounds then you might want to wait until turn 2, after you have put some upgrades like Great Strength on. Don’t fall into the trap of playing too passively though, this deck still wants to kill some fighters, you just need to pick your moment carefully.
It’s also worth remembering that you can easily run away with this deck, after you have killed an enemy leader or other important fighter you can just use a ploy like Illusory Fighter to get your relevant fighter out of the situation and deny your opponent a chance to hit them back, make them really work to try and get glory from you.
In general the deck plays fairly similarly to my old ‘midrange’ Fiends deck, except this one is more reliable in its passive glory but worse in an all-out brawl. It’s a playstyle that I first found success with in my old Farstrider days and I’m mildly amused that what started out as a ‘Mollog lite’ aggressive deck ended up naturally evolving into my preferred playstyle. I suppose there is something to be said for playing the decks that you enjoy the most.
Matchups
On my previous articles I was asked to give more advice about specific matchups for the deck I presented, so here it goes, advice for facing every single warband currently released:
Mollog – the troll that can one-shot your fighters easily and is almost impossible to hide from presents some unique issues for our deck. The best bet is to let him waste his first turn coming to you and then teleport to his squigs and get glory from killing them. Generally it’s never worth trying to kill Mollog himself, he should be running both My Turn and Aggressive defence which means that every time you attack him you just give him another chance to kill you. Expect to lose a fighter on turn 1, there is only so much hiding that you can do, you should still be able to pull a win with glory if you get the other two out of the ‘Mollog-zone’.
Cursebreakers – the dreaded ‘better’ Stormcast. There is a good reason why most people consider these guys the best warband around right now, they both inspire very easily and score lots of passive glory at the same time. Not to mention the fact that their inspired stats are incredibly powerful. Unfortunately with my deck you pretty much have to wait until turn 2 to engage them as you need to hit that 4 damage break-point. So, deploy far back, score your passive glory and then go in, prioritise Ammis first over everyone else and then just kill who you find easiest to target. If you do have Spoils of Battle and Great Strength/Glory Seeker in turn 1 then go for an early kill, in fact if you have that card combination its worth deploying as far forwards as possible and just bringing the fight to them before they can inspire.
Chosen Axes – can be a nasty challenge but if you keep your nerve you should be fine. They spend their first turn powering up by inspiring on objective’s and are more than happy to fight you if you try a teleport kill. Peal of Thunder and Distraction should always be used to stop Fjul from inspiring, if they get to play Inspiration Strikes on him then save your pushes to block his inevitable Hidden Paths. Generally you can play this matchup by pretending to be a full defensive deck, its rare for dwarfs to score glory off of objective tokens these days and they lack any mobility, so sit back and set up a BBQ while winning the game something like 6-1.
Thorns of the Briar Queen – The Queen is a scary threat that will keep trying to kill your fighters, unfortunately she starts with a base defence of 2 dodge and 4 wounds. Generally turn 1 should be spent getting a few easy kills on the low health chain rasps and using everything at your disposal to keep them off of objective tokens, this is one of the rare cases where I will deploy all my fighters forwards and mostly forgo drawing power cards to make charges, it is not worth trying to out passive objective decks. From turn 2 onwards you really want to try and kill the queen, otherwise she will be constantly wailing on your fighters and any losses are felt keenly for a 3 fighter warband.
Gitz – If you get 3 objective tokens then hang back, that fanatic is bloody scary and he will one shot your fighters if you are not careful. Defend those tokens and don’t let them score Supremacy/Our Only Way Out, look for some juicy kills from turns 2 and 3 onwards and keep camping on those tokens. If your opponents gets to place 3 tokens down then you will need to go in, your best bet is to try and avoid the fanatic, use your teleports to escape from Snirk but save your push cards for denying supremacy/Our Only way Out. In both cases it can be useful to move one of your fighters onto a key objective token, it’s much harder for the Gitz player to push a fighter off and move onto a token then to just move onto a token. Don’t ever try to kill Snirk, it’s a waste of activations; just avoid him as best as you can.
Sepulchral Guard – the advice for facing the Skeletons is almost identical to when facing the Gitz but swap Snirk for The Champion as the fighter to avoid. Outside of that you have the added advantage of if the Warden dies then the warband falls apart much easier.
Reavers – be very careful around these blood-soaked warriors, their low wounds will tempt you into killing many of them, then before you know it they have scored a ton of glory from all the blood and they have inspired to boot. If you can get away with it try to kill only one of their fighters while dodging as much as possible. Saek is target number one as he is high damage and gets cleave when inspired. Try to avoid getting dragged down into a brawl as much as you reasonably can and you should be golden.
The Godsworn Hunt – despite Tom mainlining these guys for the last couple of month’s I haven’t had much practice vs them, me and Tom have generally avoided each other at tournaments for a bit, although that should be changing soon. You don’t have to be quite as afraid of killing these guys as Reavers, it’s possible that they will be running Pure Carnage but it’s more likely that they will be packing Oath of Conquest. On that note, they will almost certainly score Oath of Conquest at the end of turn 3 so you need to be ready for that. I’d advise deploying far back and then prioritising Grundann>Theddra>Shond in that order, trying to keep your fighters as safe as possible from counter charges while doing so. One of the great factors in this matchup is your inspire condition, if they come at you piecemeal then they have a good chance to inspire you, making your fighters very hard to hit in future.
Farstriders – this is a tricky one. Generally I would advise that you deploy forwards and bring the fight to Stormcast rangers. If you sit back then they all inspire for free, while potentially pinging your guys for some chip damage with their ranged attacks. The best thing to do is to take the fight into their teeth and use your better base stats to win the day. A key part of this matchup is again choosing your moment to run away, if you get a solid lead then just turn to smoke and deny them any chance of coming back into the game.
Magore’s Fiends – pray.
I’ll elaborate.
Statswise the fiends trade pretty much one for one with your guys, they can also pack a decent chunk of passive glory through Shardgale/Rivers of Blood shenanigans and they can reliably inspire their key fighters early as most Fiends run both Furious Inspiration alongside Inspiration Strikes. As if that wasn’t enough, Riptooth has a very large threat range so it can be quite hard to hide from him, especially if he suddenly grows some Spectral Wings. Your best bet is to power up and go for the head, kill Magore. Kill Magore and your only real threat is Riptooth, the other two take a lot more effort to get kills with, a good fiends player will try to bait you into using your activations on killing those guys, don’t fall for it.
The Eyes of the Nine – this can be strangely tricky, followers of Tzeentch often pack Deceitful Step alongside Hidden Paths, and you can find yourself teleporting in for a kill while they just teleport away in response. Generally deploy forwards and go for easy kills, only try to kill Vortimus if you think you are odds on. Ignore the Blue Horror unless you absolutely have to kill it, it will waste activation’s and potentially score your opponent Summoner.
The Steelheart Mirror – this is a hard one to judge, it entirely depends what version of Steelheart’s your opponent is playing. If they are trying to make the full defensive Steelheart deck of old work (some people still do this) then you want to be the aggressor and deploy forwards, maybe even spending a couple of activation’s in the first turn moving closer. Your two push ploys are very handy in this matchup as if you know the passive objectives then you can deny them (look for Skirting Danger or Well Guarded/Unbroken Shield setups). If your opponent is playing full aggressive Steelheart’s then you want to deploy far back and make them work at coming to you – essentially it boils down to who has the most passive glory in their deck.
Phew, that’s all of the general matchups covered. Remember that in each case I am talking about the general versions of each warband that I would expect to face, if you end up playing against aggressive Sepulchral Guard then my advice would change quite a lot. As a rule of thumb go by what I said at the end of the Steelheart mirror section, try to judge which of you has the most passive glory and deploy/play based on that.
Board Choices
Reaction boards

If you lose board roll off and are anticipating the need to deploy far back then the Shyishian Stardial should be your board of choice. Its an old defensive favourite for a reason – if your opponent wants to go wide (and if they don’t then thats great for you) then no matter which way round they face the board you are going to be able to place two fighters right at the back with one only one hex in. Steelheart should always be placed in one of the back two hexes (if he dies then Commanding Stride becomes useless) while you can choose which of Angharad or Obryn you want to put a bit more forward. Generally I place Angharad forwards against low wound warbands where she might be able to get a kill with just a normal charge/attack and Obryn forwards against higher health threats.

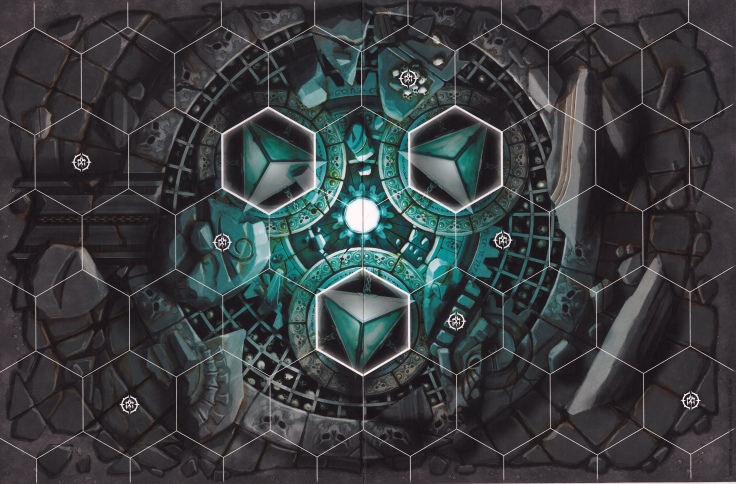
If you think you need to deploy forwards then the Katophrane’s Reliquary is a solid choice. If your opponent sets it up wide then you always have one fighter as far forwards as possible with the other 2 just one hex behind. However the Reliquary can suffer if your opponent opts for an offset or length ways setup, if you are suspicious that your opponent will go for this and want to deploy forwards then you should go with the next choice:
The Arcane Nexus has hexes spread out at all the edges and is very hard to deny for your opponent, no matter their nefarious plans.
If you are playing vs Mollog then use the Soul Refractor as a reaction board. Tom covers the best reasons why in his article here.
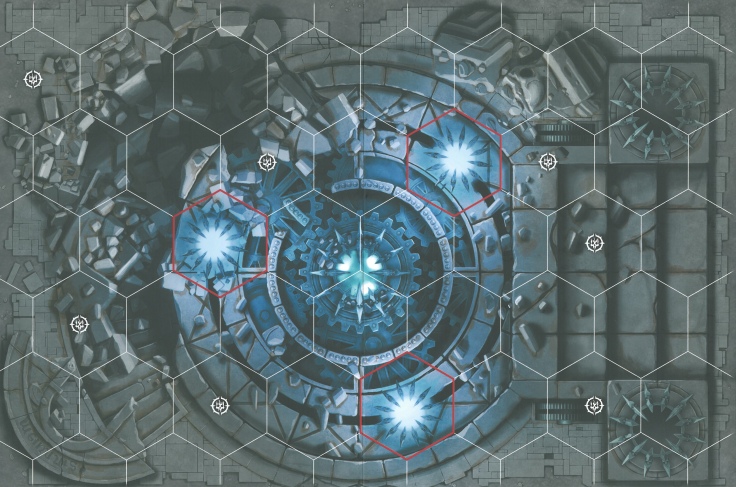
Winning boards (for when you win board placement)
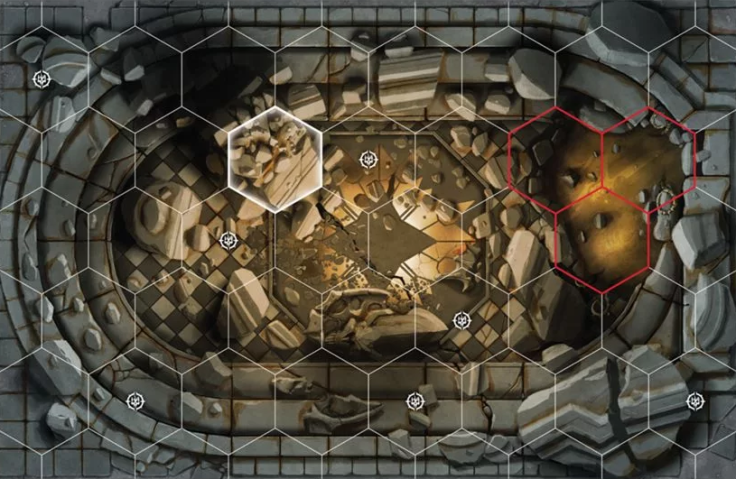
Remember all the issues I said that we can have getting a kill against 4 wound fighters in the first turn? Well this board (no idea what its called but its from the Forbidden Chambers board pack) is your solution to those issues. Deploy this offset so that the lethal hexes are all towards your top right and then only connect the top 3 right hexes of your board to theirs, your opponent will have to funnel around the edges of those lethal hexes to get to you when you deploy back. Obryn with his knockback has a good chance of one shoting an enemy fighter by shoving them into a lethal hex with an attack in activation 4.
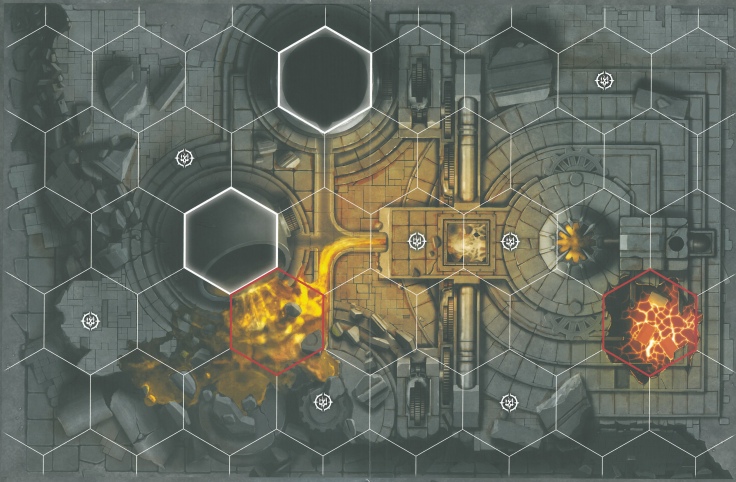
If you are against either Chosen Axes or low wound warbands and still want to deploy back then The Animus Forge is your friend. Off set the boards with the above orientation and deploy your fighters far back, laughing as your opponent struggles to close the distance.
If you win and want to deploy forwards then I love the Reliquary. Set the board as above with a wide setup onto your opponents board, pop Severin on one of the slightly further back flank hexes and enjoy having control over a large space of your opponents board as you move in for the kill.
Final Thoughts and Arrogant Boasts
Phew, that was another long one. If you can believe it I actually wrote a fair bit more then you see here but I noticed that the article was getting to long to handle and pruned it as much as I could. I hope this information is useful to you, even if you are not looking to play this style of Steelheart’s it worth being aware of how they work. I legitimately think they are quite good right now. Probably not Cursebreaker good but surprisingly close.
I’m probably going to keep at this style of article for a while as I try to complete my quest to win glass with every Warband. I’d be interested on your feedback as to what sections you thought worked best and what you think could be cut, remember for every section I add it means something else probably has to be cut. The section about refining the deck and its different iterations is probably not something I will do again, it was an idea that I wanted to cover and share but not quite worth an article in its own right so it got added to this one.
As for my quest to win with all the warbands – I’m currently at 8.


For those unfamiliar with the symbols, the warbands that I have won with are:
Farstriders
Magore’s Fiends
The Thorns of the Briar Queen
The Eyes of the Nine
Stormsire’s Cursebreakers
Mollog’s Mob
The Sepulchral Guard
Steelheart’s Champions
Unfortunately for me it looks like John Rees over at canyourollacrit is going to be the first player to win this quest as he is at 12 currently and has managed to get over the speed bump that is Eyes of the Nine. Jay Claire is also a strong contender with his 11 completed but the beast currently slumbers as he hasn’t been to a tournament in a while.
No matter if others complete it before me I am going to see this through to the end, not only because I think it is fun to do but also because it gives me a good insight into how every warband plays. It also doesn’t feel quite so bad taking home so much glass when I am not playing my ‘best’ decks.
At Steel City we would love to have your feedback. If you have something to say about a specific article then feel free to comment below, if you want to get in touch about the blog in general, or just prefer to communicate privately then you can get in touch by emailing us at team@steelcityshadespire.com

Hey great article, and congrats on the win 🙂
I’m gonna give this deck a go, I like the sound of how it plays.
Quick question though, what do you use light armour for? I really don’t understand that card in the deck (I’m obviously missing something but can’t see what it is). Cheers 🙂
LikeLiked by 1 person
Its to make your attack more reliable – one extra dice, especially as we are rolling hammers, makes a lot of difference in the odds of success. The downside of losing crits on defence is annoying but I think its worth it.
LikeLike
I actually ran a stormcast deck very similar to your second deck version, but stopped because it was boring. Your last version seems much more fun. Never really thought of focusing on the teleport instead of no-brainer charging. However I don’t understand the light armour either. I mean, having extra accuracy is great but defence is one of steelheart greater strengths. Is it worth it ?
LikeLiked by 1 person
Losing the defence does hurt – however if you ensure you get a kill then they have one less fighter with which to even try to hit you back – its possible a play style choice more then a just ‘this is the right way to do it’ kind of thing – I personally hate relying on defence dice and play assuming that my opponent will hit.
LikeLike
Thanks for the reply. Do you think that this teleport build could be adapted for chosen axe? Given the amount of push/inspire cards they need I am not sure it is doable
LikeLike
Hi, thanks for the article, probably the best analysis i ve read up to now 🙂
To complete it, I felt only one thing was missing: the orruks match up
What do you think they could do to make your life hard?
Thanks!
LikeLike
Im shocked that I forgot to mention Ironskullz Boyz – its probably a sad sign for them that i forgot them – I just never see them played at tournaments these days. Like Fiends this build of Steelheart’s loses in an all out brawl but unlike Fiends the Orcs really lack the mobility to threaten you while you ‘power up’. The biggest issue you have is that Gurzag is a massive threat that is very hard to one shot. Focus on kill Bonecutter if possible and try to stay away from Gurzag – treat him as a Mollog lite. I have seen good Orc builds that focus all of the power onto Gurzag and it can be quite scary – however you should have the tools to keep him away if he tries any Hidden Path’s etc tricks to close on you early.
LikeLike